Showing posts with label simple. Show all posts

Tuesday, August 6, 2013

Its the Simple Things

If you are ever in the north Texas area, you must visit 

They are re-opening their store this week
in a brand new location and it is amazing!

I asked them if I could share the news and
some of the pictures here on my blog because 
you just have to see this place.

This isn't just a regular furniture and home decor store 
where you walk in to see the merchandise.
It's an experience. 
   How many stores do you go into and actually marvel at the walls of the building or notice the ceiling and the floors.  
The place is a beautiful structure.  
You'll want to move right in. 


Can someone put these floors in my house please?

Once you get past the stunning architecture of the building
 (which they created from a generic warehouse space),
get ready for your jaw to drop.

Here are some pictures of inside Simple Things.


Those seltzer bottles are not just any bottles.
See the tag?  It says Joe T. Garcia's which 
is a restaurant icon around here. How cool.


This is so me.  Love the pop of red!

Not only will you want to buy everything,
but you will be inspired with decorating ideas.

I know.  Your jaw dropped.
Close your mouth before you drool.


Are you wanting more?
Get ready to blow up your Pinterest account.
Click here to visit their blog and see more pictures
of how they built this store and more of what is inside.
Better yet, visit them at 
7401 W Vickery
in Fort Worth, Texas.

What do you think?  Are you in love with this place?
What did you pin?


Monday, March 14, 2011

Painting clay pots for spring


Here is an easy project that is pretty quick to do and fun to do with kids.  
I love terracotta pots but not the orangy color.  
These pots are easy to paint so here's how I makeover mine so they look a bit aged.

You will need terracotta pots, whatever style and size you want. Watch the sales at Hobby Lobby and you can get the small ones for cents and the larger ones for a dollar or two.  I used small ones in a couple of different sizes.  You will also need craft paint in whatever colors you choose.  I used red, a couple of shades of green and creamy white. You may also need brown if you decide to age them.  I also use crackle medium.  Grab a paintbrush, a paper plate and some paper towels and you're ready to go.

I couldn't find the exact color of green I wanted so I used two shades and dabbed my brush into both.  
I didn't want to mix them perfectly.

First, I painted the saucers and pots white, leaving the tops bare.

Then, I painted the tops in the colors I chose.  
I decided to paint the saucers for the green pots green as well.

These do not need to be painted perfectly.  Imperfections give it character 
so just slap the paint on.  One good coat should do it.

After the paint dries (which is really quick), brush on the crackle medium.
Just follow the directions on the bottle.  Here you can see the one on the left has crackle medium applied
and the one on the right does not.

After you let the crackle medium dry according to directions, mix a little brown paint with water.
You want it to be very watery which will make it easier to add in layers until you get the effect you want.  Brush it on and wipe it off.  As it all dries, you will begin to see the cracks in the paint.  I've also done this with stain instead of brown paint.

Here are pots that are freshly painted with out aging.

Here are the little pots that have cracked and aged.


With the green pots, after I painted them and added the crackle medium, I then painted white all over them.  The white cracked and allowed the green to show through.  Then, I added the watery brown over all of it and wiped off.  I wiped (maybe scrubbed a bit) so some of the white would flake off leaving a lot of green showing through.


So, what could you do with these cute little things?  Of course, you can plant little flowers or plants in them and set them where ever you want little plants (windowsills, a chair, bookshelves, kitchen, etc.) You can use them to hold utensils, paint brushes, pens/pencils, etc.  You can put some soft filler in them and use them to hold eggs for Easter.  

OR

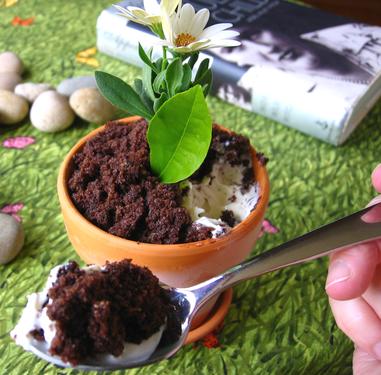
you can make "Dirt Pudding" and make individual servings in the little pots.  
These would be cute at a party or sitting next to each plate.  I've done this before using little individual pots and let guests take the pots home.  Kids love this and often don't want to eat them so they can take them home and show their family.  They make great treats for teachers and school staff as well.  
You can also share them with neighbors.
foodista
Dirt Pudding Recipe
(this will make enough for a regular size large pot or many small pots)
1 bag of Oreos
1 box (large size) instant vanilla pudding
1 small box of cream cheese
milk
1 large container of Cool Whip

Crush Oreos.  You can use a blender, food processor or put them in a heavy duty baggy (like a freezer baggy that zips close) and let your kids beat it up or step on it.  It works and it's fun.

Mix the vanilla pudding and 2 cups of cold milk.  Add the cream cheese to the pudding and mix well with an electric mixer.  Add Cool Whip to the pudding mixture and blend well by hand or with an electric mixer on low.

To assemble in a large pot, layer it all starting with a small layer of crushed Oreos on the bottom, half of the pudding mixture, another small layer of Oreos, the remaining half of the pudding and top with the rest of the crushed Oreos. If assembling small pots, use proportionate amounts.

Tips:  The pots have a hole in the bottom.  For large pots, put a layer of foil on the bottom of the pot and place one uncrushed Oreo on top of the foil but over the hole.  For small pots, just line the bottom with some foil.  
To make it look like a real pot, add an artificial flower or greenery to the pot. 
 Add gummy worms, clean sea shells or clean rocks.  

I may be linking up to some of my favorite blog parties listed in the link at the top of my page 
or down on the bottom right of my page.


Sunday, January 2, 2011

first project: a sign

...and we're off!  I finished my first project of the new year this weekend.  
It's a simple, quick one but it turned out well (or at least I think it did).  

Back in October, you may recall this post where we refreshed our front porch.
Part of the "refresh" included replacing a piece of wood on one of our columns.  That piece of wood was chippy and white but of course that doesn't look good on the front of the house but it might look good inside the house...so I kept it...and my husband gave me looks like I had lost my mind.

That little old piece of wood made a nice little sign to go in my kitchen.


Here's what we started with:

Here's what I did with it:


Here's the finished sign:


Pretty cute huh?

Hey Lori at IPOMP, just imagine if it said "Pickle"!


linking up to my favorite link parties listed above or down below on the right

Monday, September 20, 2010

Sunroom to Project Room: Mission Accomplished

Finally!  FINALLY! My sunroom is done. For those of you who have been following this saga, I have a great sunroom that had become a storage room while we worked on other rooms in the house. Here's an embarrassing picture of the before:


You can read all about the before here.  The plan was to turn this junk-filled room into a new project room for me.  I wanted a place where I could spread out on a project table or on the floor, have a lots of storage for all of my supplies and tools yet still be a pretty place to sit with friends.  After seeing inspiring pictures of calm rooms with beautiful neutral palettes, I decided that's the direction I wanted to go.  After a few weeks, I changed my mind.  The neutral palette just wasn't me.  So, I started all over.  The room has a neutral backdrop but I added color which is way more me.  So, here is the new project room:

The room has pretty french doors as you enter.  You can see the concrete floors covered with a Pottery Barn rug I got for a steal last year.  You can read more about the floors here.
Some of these pictures may be a little dark because it was difficult to control the light in this bright room. You can see the work table I painted and talked about in any earlier post.  
My cousin had given me the old window that hangs on the wall.  I'm using it as a dry-erase memo board. On the table in the corner is an antique gold scale my father used in his jewelry business.
Here are the old drawers I had in the garage.  I cleaned them up and just put a coat of sealer on them.  I made labels for each drawer which right now are numbered.  After I get them filled and organized, I'll change the numbers to words/labels so I'll know where everything is.  Then, I'm sure some of the drawers will be open quite a bit since I'll be using the stuff in them but that's okay because the drawers are galvanized metal and will look so cool left open.  That's my kind of storage.
Here's a close up of the dry erase memo old window.  
This little old child's rocker sat in my parents' house as far back as I can remember.  I think every kid in our whole extended family has sat in that rocker.
This old cedar closet was from my parents and I think my grandmother before that.  It was  red and had a fake crackle finish.  I painted it with a pale grayish white. I added a an old chippy clip holder to one door and some junk on top.
I still need pillows for the bench next to the cedar closet but some lively quilts and throws add color right now.
Tip: I put petroleum jelly on the hardware of the cedar closet so paint wouldn't stick to it and I wouldn't have to tape it all to protect it.  I'm just lazy that way.  I didn't have to be careful and could paint right over everything.  Once I was done, the paint peeled right off of the hardware.  I actually left bits of paint on them because I liked the way it looked.
There is lots of storage in that cedar closet. I have 3 metal baskets on the top shelf and may add more later.
Here's some of the junk on top of the cedar closet.  There's a child's red rocker,  an old soft drink crate I had hanging in my room as a kid and a metal red arrow I got on clearance from Sundance Catalog.
I picked up this chippy clip at the Red Shed.  It holds my inspiration photo.
I still want lots of pillow for the bench but I can take my time to find just the right ones.  I do like the bench recovered in drop cloth.
I used another soft drink crate (in favorite color RED) to hold craft paints and glue.  That idea is stolen straight from Funky Junk Interiors.
My pal, Jennie, gave me this wooden slotted storage piece.  I can put office supplies, magazines, paper, camera, or just about anything else in those cubbies.  
I love that this thing.  It's just tons of cool storage.  I put my new galvanized tote on top to store spray paints.
I like the old paper labels still stuck on the side
This piece is really sturdy too. I could add cushions and it would be extra seating if needed.
Back around next to the entry is the fireplace.  On the wall next to it is a metal baking rack.  It can hold more supplies if needed.
On the mantel, I sat one of my favorite green shelves.  I like the shape, color and the chipped worn finish of this shelf.  In the future I can add decorative elements or perhaps a row of buckets or other containers to hold more supplies.
I just love this shelf.
Above the shelf is my printer's tray that I've had since I was a kid.  You know all those little trinkets and mementos kids bring home that they want to keep?  I kept mine in this printer's tray that hung on my wall in my bedroom.  It was my mom's idea because even way back then, she was a junker with good taste.  Now,  I just need to fill this back up with some cool things.
Did I mention that I love this shelf?
Yep, another shot of that shelf.
Some of you saw the blue and white material I had placed under the glass on the project table.  I replaced that with drop cloth and painted two red stripes on the drop cloth.
There's my awesome stool that I got here from a fellow blogger.
Yes, that drop cloth is a bit wrinkled but 1) they will work themselves out eventually and 2) it will get covered up with photos, notes, etc. that will go under the glass over time.
I added my big 2 ft. tall chippy white "G" I picked up at the local antique mall.  There's also another jeweler's scale on top of the drawer unit.
I'm lovin' this room.
It's so me.
There is still so much more potential in this room.  It has tons of storage and I still need to move in all of my supplies and tools.  I want to add a few pillows and smaller details but overall it's done and I like it.  Since I had almost everything, this room cost very little to do.  I had almost all of the furniture and decor and almost all of the paint and supplies.  So, here's the breakdown:
  • one gallon of paint for the table an cedar closet: $25.00
  • one piece of glass cut for the table: $30.00
  • bar stool with the 3: $30.00
  • huge galvanized tool tote: $20.00
  • large G: $30.00
  • drop cloth for recovering bench/put under glass on table: $10.00 (and there's a lot left)
  • new Macbook Pro computer:  priceless
Total costs: $145.00 for the whole room.  That's not bad, huh? This is one of my favorite rooms.


Related Posts with Thumbnails