Wednesday, March 10, 2010

cheap vintage linen drapes...sort of

I needed curtains for my den in progress.  We have high ceilings and huge windows.  I looked high and low and quickly realized we were going to have to take out a second mortgage to buy curtains for the space.  I looked at blogs for ideas and alternatives.  Finally, on The Lettered Cottage (no surprise there), I found the idea of using drop cloths for curtains. That really gave my husband a big chuckle but off to Home Depot we go.  We find the drop cloths and they are about $10. bucks each.  They are 6'x9' and hemmed (which is huge since I don't sew).
So we bought 4 for a total of $40. What did we have to lose?  If we don't like them, we can use them as drop cloths.  We also bought drapery rods and drapery clips to hold the "curtains."  We got them home, opened them up and they seemed a little stiff.  So, I decided to wash them all on gentle cycle and dry on delicate.  When I opened the dryer to get them, do you know what came out?  The perfect impersonation of vintage linen drapes!  Are you kidding me? We hung them up so fast.  I loved them.  What's better than forty dollar drapes...for four panels?  Well, I tell you.  I went to Hobby Lobby and bought 4 huge wooden red buttons and put one on each panel.  Just a little whimsical touch. 

If we pull them closed, they completely cover the windows since they are six feet wide.


New vintage linen curtains, 9 feet tall, 6 feet wide, no sew, 4 panels, 40 bucks.  You can't beat that!

Monday, March 8, 2010

odds and ends...wrapping up unfinished business

I've noticed that I have a few posts that sort of leave things hanging so I decided to update a few things. 

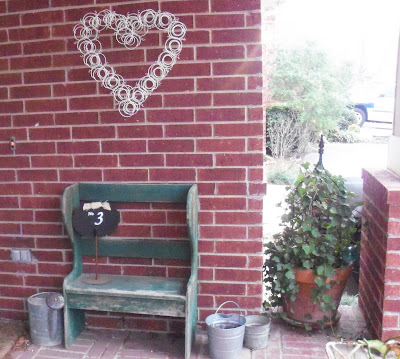
If you read in February about my rustic mattress springs heart, then you'll recall I wasn't sure what to do with it.  Well, I decided to paint it and hang it on my front porch.  So, the first piece of unfinished business is
showing you how that turned out.


The other loose end to tie up is that I mentioned Jennie and I went to the Red Shed and Canton First Monday Trade Days a little over a week ago and I mentioned I would post pictures of my finds.  Well, here  they are!
From Canton
That little red 3 is my favorite thing!

Little porcelain balls with letters and numbers
a cottage dog leash holder with zinc bone; you can write on it with chalk!
old garden hose holder; it rolls easily around the yard
that old galvanized metal will look so cool on the front porch or side of the house
actually holding our garden hose...so much better than any new one!
old vintage french cycling print for my husband
close up view
it goes well with this reproduction one that hangs in our office

Okay, that's it!  I'm all caught up!

Sunday, March 7, 2010

Pardon my dust...and thanks!

Don't leave...it's still me!  I've just made a few changes.  When I first started this blog on January 1st, I had no idea what I was doing.  I followed some directions I found and picked a pre-made template I liked.  After living with it for the past two months, as cute as it was, it just wasn't totally me.  I still don't know what I'm doing but I have learned a few things.  I can join a McLinky party (and that's been fun) and I can make the blog header more my style.  So, I've made a few changes that reflect me and my style.  I may make a few more so don't be surprised if it looks a bit different over the next few weeks.

I can't believe in only two months I have over 40 people following my blog and over 4000 visits.  I thought only a couple of friends and family would actually look at it.  It's been really fun seeing strangers visit, leave comments and show interest in the little things I do. Thanks to everyone who has become a follower, left a comment and visited.  I really appreciate it and it has made this so much fun! 

Thursday, March 4, 2010

Chalkboards...

Since I love chalkboards, I thought I would show a few around our house.  Can't wait to check out how others use chalkboards in creative ways.

We have an old chalkboard that hangs on the pantry door so we can leave notes for each other, write little reminders to ourselves or so my son can draw and write funny things for us to notice.


This cute little two sided chalkboard lives on our front porch.  One side shows our family number and the other side is used to make signs for holidays, events or just to say 'welcome.'
What's up with our family number?  See the post called "3 is the magic number."
An old window with chalkboard hangs as artwork with the lyrics of our family song.


Not actually chalkboard.....
...but could be!
This is a dry-erase wall in my son's room.  We painted it with dry-erase paint that you can usually find in stores next to chalkboard paint.  It's not chalkboard but it's just as cool!  He loves this wall. 


Sunday, February 28, 2010

Get your numbers on...

Stopped by The Red Shed  for their Saturday Sale this weekend and picked up a few great things.  One of my favorite things was this metal box.  I think it just needed a little something to make it perfect.  I decided to put some numbers on the front.  Two things you should know here; one, I rarely put anything in my house that doesn't have some sort of personal meaning for our family and two, I rarely do things the way I probably should.  I've seen on other blogs various ways of making stencils and transfers or even handpainting things.  I either can't figure out how to do those things or don't have the talent or steady hand to do it.  So, here's my extremely simple way of putting numbers or letters on items around your house

Here's the box.  Pretty cool, huh?.


I chose the numbers "9116".  Those are our house numbers.  This is the house we chose to be our family home.  We moved in when our son was very young and we'll retire here.  Using the computer and our regular ol' printer, I chose the font and size I wanted and printed out the numbers on regular paper.

Using an exacto knife, I carefully cut along the lines.

Be careful to save the middle of the numbers like 9, 6, and 0.  Put those pieces back in place when you are ready to paint (use a piece of doublestick tape to hold it).  Using craft paint and a foam stencil brush, dab on the paint. 

There you have it.  That's all there is to it. I"m sure there are better ways to do this but this is cheap and easy.

Before.....
After!

Wednesday, February 24, 2010

Industrial pendant light you can make

As I continue to look at every single page of the new Flea Market Style Magazine, I'm finding some great ideas.  But when I saw their pages about using funnels, I fell over.  See the picture below?  The one of their funnel pendant light?  That's my light!  Well, not my actual light but one just like my light. I've been wanting a new pendant light in my dining room.  I wanted something industrial.  I was considering purchasing this one but just wasn't sure.  Then, my husband and I went to a great architectural salvage place here in Ft. Worth and found this industrial funnel they had already wired as a pendant light.  It wasn't expensive but you could make your own with a funnel and wiring kit.  I've rewired lamps and it's easy.  The directions are actually on the rewiring kit.  After hanging my new light, I added a thin, red stripe around it so that it fit in the room perfectly.  Some laughed at my new fixture, but I loved it.  Now, it's famous!

Here it is in the magazine.
Look closely.
Here's mine!  Exactly the same.
Here it is with the little red stripe!

Sunday, February 21, 2010

flea market artwork you can do

If you found your copy of Flea Market Style Magazine, you'll see some lovely vintage paintings on page 93. (I found my copy of the wonderful magazine at Barnes and Noble in Texas).  I love these and although they are fairly easy to find and relatively inexpensive, I had difficulty finding just the right ones.  So, a couple of years ago, I made my own. I found the right posters I liked here. (I used posters and not the art prints because posters were cheap; $10.00 or less.)  I then got some thin plywood and cut it to the size of the poster.  Glue the poster onto the wood.  I used Mod Podge.  Then, using a small paint brush, I brushed the glue over the front of the poster and around the edges to seal it.  If you brush as if you were "painting" the picture, you will leave the slightest image of brush strokes to make it look like a painting.  After it dried, I took some cheap brown craft paint (about $1.00) and rubbed it on and wiped it off to "age" the painting.  There you go.  That's it.  I don't like to frame mine but you certainly could using a great old frame.


Related Posts with Thumbnails