Tuesday, March 29, 2011

a few photos from Warrenton/Round Top


Let me just say this first, we were a bit overwhelmed.  There was so much to see.  
Every two seconds we were like "Oh my gosh, look at that!"  
We were so busy looking at all of the stuff, we forgot to take a  lot of pictures.  
You just don't think about it when your eyes are just darting from thing to thing.  
So, here a few pictures we took.

First up, from La Bahia Antiques Show is Linda Gregory's spot called Past Time Antiques.  
Her card says she has 5000 sq. feet of vintage inspiration on Allen St. in Edna, Tx.  
We loved her stuff and we did buy something from her that I'll show you later.

Look at the center pieces on this table.  Love them.  
I also like the black chairs around the farmhouse table. The little cloches look so cute on the plates.

Up close, these are white enamel tubs mounted on old wooden balusters.
LOVE that!  

Here's a lamp shade that was so cool.

This cute little cheese cupboard caught my eye.  

Next up are some pictures of Excess Field.
Lots of industrial type stuff to see.

We took pictures as we drove around.  Most of this stuff here was awesome but a little expensive and 
way too big for our vehicle. So, we didn't get out so we wouldn't be tempted.

More from Round Top...


So there's a little taste of some of what we saw.  What do you think?

Monday, March 28, 2011

...screeching halt


Are you ever just so busy with so many things and just running around trying to do it all and then all of the sudden something unexpected happens and everything comes to a screeching halt?


Meet Maisy.

She's our unexpected something that happened.  My husband and son surprised me with her Sunday evening after Jennie and I returned from Round Top/Warrenton.  It was a total shocker.  I grew up with small dogs but my husband did not.  He doesn't like small dogs (anything under 40 pounds is small to him.)  I've been talking a lot lately about wanting a small dog.  I love my labs but I miss having a little lap dog who curls up in my arms.  I thought I would have to work months to convince my husband.  

Then he saw this little thing.  She's a Maltese-Yorkie mix; a "Morkie".  
She weighs 1.7 pounds and should grow to about 4 pounds.
She's 7 weeks old.   
She's spunky and not afraid of anything. 


She's about the size of a soda can although it weighs more.  
This cute little fur-ball of a surprise has interrupted all of the posts I have planned
so hang in there with me.  I'll get them up.  I have so much to show and tell you from
Round Top/Warrenton, photos of my cousin's cottage, a giveaway and so much more.

Oh, and my husband?  He's completely smitten with her.  She crawls up on his chest, 
snuggles under his neck and naps with him.


Friday, March 25, 2011

change of plans

I had planned for a couple of new posts and a giveaway this weekend and next weekend we would be headed to Round Top for the big antiques fair.  Change of plans!  We're leaving bright and early in the morning to go to Round Top/Warrenton/Marburger Farms for this weekend.  So, my posts and giveaway will have to wait a few days.  I'm hoping to come back with some sweet finds!

See ya'll in a few days!

Tuesday, March 22, 2011

all work and no play...not me

Now that my pal, Jennie and I have a booth at a local antique mall, we now have to "work" the mall which means we have to donate 4 hours per month walking the mall (helping out, helping customers, etc.)  If we don't want to walk the mall, we can pay a monthly fee and skip it.  If we do it together, we each only have to walk 2 hours. The first time we did this was on a Saturday afternoon and we didn't walk the mall, we ran.  We were so busy that the time just flew by.  This month, we walked on a Friday morning.  There were very few shoppers so all we could do was just walk...and walk...and walk....for 2 hours.  There is an upside to that though.  We shopped.  We walked around every single booth and looked at every single thing.  We spied a couple of things we wanted and as soon as our 2 hours were up, we bought them!  I actually found 3 things I really wanted.  I'll show you the first one today and the other 2 later in the week.


I picked up this large tool box.  I like that it's white.


It's almost as long as my coffee table.


It has these handy little pockets for holding tools. It would be a great place
to keep remote controls...if we had a tv in this room.  This is in our main living area
downstairs and we don't have tv in this room...by choice.  
We keep the tv upstairs in the tv room.

I'm sure I'll find something else to put in those pockets.
Any suggestions?


It holds magazines perfectly.


Here's one of my little aged pots next to it.  


 Toolbox special


Tuesday, March 15, 2011

little industrial table & a surprise

I'm finding that I have a somewhat eclectic style.  
I know I don't really care for modern.  I like old...but I'm learning that 
I like a lot of different kinds of old.  I like vintage or antique. 
I like cottage style and farmhouse style with a bit of industrial loft style thrown in.
I like chippy and rusted and character.  I like things that tell a story.

At the Red Shed French Market sale a few weeks ago, I found this little industrial table for $15.  It's a great size, in great shape and looks pretty cool.


I don't like the green color though and there were a couple of rough places.
Nothing a good can of primer and glossy white spray paint can't fix.

Now I think I've mentioned before that I hate prepping things for change.  
I wanted to just immediately start painting but on this piece I really wanted
to keep the aluminum metal parts as is.  This included the screws, the wheels and 
the parts that swing up and prop up the sides.  I taped off the wheels and the "arms" 
that hold up the sides but I did not want to try and take itty bitty pieces of tape 
and cover the screws.  So, I grabbed my jar of petroleum jelly.  A little dab of this
stuff rubbed over the screws will not allow the paint to stick to it.

I spray painted right over the screws coated with the jelly.

Once the paint was dry, the paint on the screws just peeled off.


Here's the final product.  I love it white. 
Now I just have to figure out where to put it.
Do you see those little boxes stacked up on it? 
I'll tell you about those in a second.
3ringcottage


Here's a close up of the boxes.  These sat on a table in my
parents' house for as long as I can remember.  I knew what was in
the bottom one but I don't recall ever looking in the top one....until now!
3ringcottage

The bottom one contains a set of weights for a scale.  
I have several scales so I'm not sure which one, if any, these weights belong to
(for those of you screaming that I ended that sentence in a preposition, this is for you:
...to which these weights belong :)
3ringcottage

Look what was in the little box...little stamps with the months of the year.
I'm guessing these had been in my family's jewelry business and once my mom
saw them, she brought them home.  Aren't these little things cute?
3ringcottage

So, any ideas?  What can I use my new little industrial table for?

I'm linking up to some of my favorite parties listed in my link above or down on the bottom right.

Monday, March 14, 2011

Painting clay pots for spring


Here is an easy project that is pretty quick to do and fun to do with kids.  
I love terracotta pots but not the orangy color.  
These pots are easy to paint so here's how I makeover mine so they look a bit aged.

You will need terracotta pots, whatever style and size you want. Watch the sales at Hobby Lobby and you can get the small ones for cents and the larger ones for a dollar or two.  I used small ones in a couple of different sizes.  You will also need craft paint in whatever colors you choose.  I used red, a couple of shades of green and creamy white. You may also need brown if you decide to age them.  I also use crackle medium.  Grab a paintbrush, a paper plate and some paper towels and you're ready to go.

I couldn't find the exact color of green I wanted so I used two shades and dabbed my brush into both.  
I didn't want to mix them perfectly.

First, I painted the saucers and pots white, leaving the tops bare.

Then, I painted the tops in the colors I chose.  
I decided to paint the saucers for the green pots green as well.

These do not need to be painted perfectly.  Imperfections give it character 
so just slap the paint on.  One good coat should do it.

After the paint dries (which is really quick), brush on the crackle medium.
Just follow the directions on the bottle.  Here you can see the one on the left has crackle medium applied
and the one on the right does not.

After you let the crackle medium dry according to directions, mix a little brown paint with water.
You want it to be very watery which will make it easier to add in layers until you get the effect you want.  Brush it on and wipe it off.  As it all dries, you will begin to see the cracks in the paint.  I've also done this with stain instead of brown paint.

Here are pots that are freshly painted with out aging.

Here are the little pots that have cracked and aged.


With the green pots, after I painted them and added the crackle medium, I then painted white all over them.  The white cracked and allowed the green to show through.  Then, I added the watery brown over all of it and wiped off.  I wiped (maybe scrubbed a bit) so some of the white would flake off leaving a lot of green showing through.


So, what could you do with these cute little things?  Of course, you can plant little flowers or plants in them and set them where ever you want little plants (windowsills, a chair, bookshelves, kitchen, etc.) You can use them to hold utensils, paint brushes, pens/pencils, etc.  You can put some soft filler in them and use them to hold eggs for Easter.  

OR

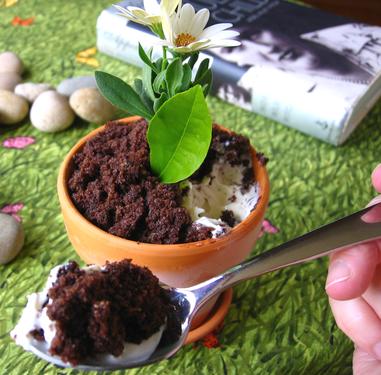
you can make "Dirt Pudding" and make individual servings in the little pots.  
These would be cute at a party or sitting next to each plate.  I've done this before using little individual pots and let guests take the pots home.  Kids love this and often don't want to eat them so they can take them home and show their family.  They make great treats for teachers and school staff as well.  
You can also share them with neighbors.
foodista
Dirt Pudding Recipe
(this will make enough for a regular size large pot or many small pots)
1 bag of Oreos
1 box (large size) instant vanilla pudding
1 small box of cream cheese
milk
1 large container of Cool Whip

Crush Oreos.  You can use a blender, food processor or put them in a heavy duty baggy (like a freezer baggy that zips close) and let your kids beat it up or step on it.  It works and it's fun.

Mix the vanilla pudding and 2 cups of cold milk.  Add the cream cheese to the pudding and mix well with an electric mixer.  Add Cool Whip to the pudding mixture and blend well by hand or with an electric mixer on low.

To assemble in a large pot, layer it all starting with a small layer of crushed Oreos on the bottom, half of the pudding mixture, another small layer of Oreos, the remaining half of the pudding and top with the rest of the crushed Oreos. If assembling small pots, use proportionate amounts.

Tips:  The pots have a hole in the bottom.  For large pots, put a layer of foil on the bottom of the pot and place one uncrushed Oreo on top of the foil but over the hole.  For small pots, just line the bottom with some foil.  
To make it look like a real pot, add an artificial flower or greenery to the pot. 
 Add gummy worms, clean sea shells or clean rocks.  

I may be linking up to some of my favorite blog parties listed in the link at the top of my page 
or down on the bottom right of my page.


Related Posts with Thumbnails